Why Should You Make a Cardboard Cat Scratcher?
Cost-Effective Solution
Cardboard is an affordable material, and making your own scratcher can save you money. Store-bought cat scratchers can be expensive, especially if you have more than one cat or if your cat uses it frequently. With cardboard, you can create multiple scratchers at a fraction of the cost.
Eco-Friendly
Cardboard is a recyclable material. Making a cardboard scratcher is a great way to reuse old boxes and reduce waste. By giving your cat something to scratch, you can recycle cardboard and contribute to a more eco-friendly environment.
Customizable Design
Making your own cardboard cat scratcher gives you the freedom to design it exactly how you want. Whether you want a simple flat scratcher or a multi-level structure, you can create a design that fits your cat’s preferences and your home’s space.
Before you start building your cardboard cat scratcher, gather the following materials:
| Material |
Purpose |
| Cardboard Sheets |
The main material for the scratcher. |
| Hot Glue Gun |
To bond the layers of cardboard together. |
| Scissors or Box Cutter |
For cutting the cardboard into the desired shapes. |
| Ruler or Measuring Tape |
To measure and cut accurately. |
| Pencil or Marker |
For marking the cardboard before cutting. |
Step-by-Step Guide to Making a Cardboard Cat Scratcher
Step 1: Choose the Right Cardboard
The first step is to select the cardboard. Make sure it’s thick and sturdy enough to withstand scratching. If you have a large cat or multiple cats, opt for a thicker cardboard to ensure it lasts longer. You can repurpose old cardboard boxes, or you can buy new sheets from a local store.
Step 2: Measure and Cut the Cardboard
Measure the size of the scratcher you want to make. You can create a simple rectangular scratcher or a more complex design, such as a spiral or wave-shaped one.
-
For a basic scratcher: Cut the cardboard into rectangular strips. Each strip should be about 2–3 inches wide and 10–12 inches long, depending on the size of the scratcher.
-
For a spiral design: Cut the cardboard into wider strips, so you can roll them into a spiral shape.
Step 3: Glue the Cardboard Layers Together
Once you’ve cut the cardboard, the next step is to glue the strips together. Use a hot glue gun to apply a thin layer of glue to the edges of each strip and press them together. If you're making a spiral design, begin gluing the strips into a spiral shape, starting from the center and working your way outward.
Step 4: Assemble the Scratcher
Once the glue has dried, you can assemble the scratcher. If you're making a simple flat scratcher, arrange the glued strips in a row and press them tightly together. For a more intricate design like a tunnel or multi-level structure, continue gluing the cardboard pieces together, ensuring each layer is securely in place.
Step 5: Let the Glue Dry
Before letting your cat play with the scratcher, allow the glue to dry completely. This will ensure the scratcher holds together well and is safe for your cat to use.
Types of Cardboard Cat Scratchers You Can Make
Cardboard scratchers come in different shapes and sizes. Here are a few ideas to inspire you:
Simple Flat Scratcher
This is the most basic design. A flat scratcher is simple to make and provides your cat with a large surface to scratch. You can make it longer or wider depending on your cat’s preferences.
How to Make It:
-
Cut several strips of cardboard.
-
Glue the strips together in a rectangular shape.
-
Press firmly and allow it to dry.
Spiral Scratcher
Spiral scratchers are fun and engaging for cats. They mimic the motion of climbing and scratching around a pole, which cats love.
How to Make It:
-
Cut wide strips of cardboard.
-
Start gluing the strips into a spiral shape.
-
Ensure the spiral is tight and smooth.
Ramp Scratcher
For extra fun, you can make a cardboard ramp that your cat can climb and scratch. This is a great addition to any cat tree or stand-alone scratcher.
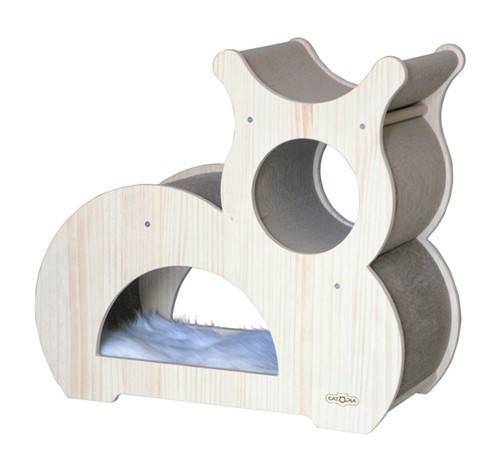
How to Make It:
-
Cut long pieces of cardboard.
-
Glue the pieces together at an angle to create a ramp.
-
Add a scratching surface to the ramp for climbing and scratching.
How to Keep Your Cardboard Scratcher Interesting\uFF1F
Once your cardboard scratcher is complete, there are a few things you can do to make it even more appealing to your cat:
-
Sprinkle Catnip: Cats love catnip, and sprinkling a little on the scratcher will make it irresistible to them.
-
Add Hanging Toys: Attach a small toy or two to the scratcher to keep your cat entertained.
-
Rotate the Position: Cats like variety. Moving the scratcher to different areas in your home can keep your cat’s interest high.
Benefits of Cardboard Cat Scratchers
Affordable and Easy to Make
Cardboard scratchers are cost-effective and easy to build. You can use materials you already have at home, which makes them an excellent option for anyone on a budget.
Promotes Healthy Scratching Habits
Cardboard scratchers help maintain healthy claws by giving your cat a place to scratch. This prevents damage to your furniture and ensures your cat’s claws stay sharp.
Environmentally Friendly
Cardboard is recyclable, so making your cat’s scratcher from this material is an eco-friendly choice. You can also reuse old boxes and reduce waste.
Conclusion
Making a cardboard cat scratcher is a fun and easy project that will keep your cat entertained and your furniture safe. By following these simple steps, you can create a customized scratcher that suits your cat’s preferences. Whether you make a flat scratcher, a spiral design, or a multi-level tower, your cat will appreciate the effort and enjoy scratching away.